Updated Aug 07, 2026 15 min read

How to Test a Flutter App on Android Devices
Explore a practical approach to Flutter Android app testing, covering integration tests, Android-specific behavior, native plugins, and performance on physical devices.

Flutter reduces the amount of platform-specific UI code a mobile app development team needs to maintain, but it does not eliminate Android-specific risks. As explained in Flutter’s official architecture documentation, an Android app uses a platform-specific embedder that connects Flutter to operating-system services such as input, accessibility, rendering surfaces, and the application lifecycle. Testing must therefore cover not only Flutter functionality but also Android permissions, system UI, native plugins, screen configurations, input methods, and device-specific behavior.
This is especially relevant in 2026. According to Google Play’s target API requirements, starting August 31, 2026, new mobile apps and app updates must target Android 16, API level 36, or higher. Developers who need additional time may request an extension until November 1, 2026. Apps targeting API level 36 should be tested for the Android 16 behavior changes, including mandatory edge-to-edge rendering on Android 16 devices, Predictive Back behavior, and updated orientation and resizability rules for large screens.
Native compatibility also requires attention. Since November 1, 2025, Google Play has required new apps and updates targeting Android 15, API level 35, or higher to support 16 KB memory page sizes. Flutter apps can be affected when plugins or third-party SDKs include incompatible native libraries, even when the Dart functionality works correctly.
Post-release quality can be measured through Android vitals. Google Play currently defines overall bad-behavior thresholds of 1.09% for user-perceived crashes and 0.47% for user-perceived ANRs. Exceeding these thresholds may reduce an app’s discoverability. Excessive partial wake locks have a threshold of more than 5% of battery sessions, but this metric remains in beta and does not currently affect discoverability.
A professional Flutter Android testing strategy must therefore validate the Flutter layer, its integration with Android, native dependencies, production-like builds, and representative devices, not just whether the main user flow works on one phone.
What Is Flutter, and What Does Android Still Control?
Flutter is Google’s open-source framework and SDK for building applications from a shared Dart codebase. In a typical mobile product, Flutter owns most of the widget tree, rendering, navigation, and shared business logic. Android still owns or influences several critical parts of the user experience:
- application installation, signing, packaging, and process lifecycle;
- runtime and special permissions;
- notifications, system pickers, the Sharesheet, and Settings screens;
- status bars, navigation bars, cutouts, and keyboard insets;
- the system back gesture and task behavior;
- platform channels, native plugins, and embedded Platform Views;
- camera, biometrics, maps, WebViews, media, payments, and other SDK-backed flows;
- accessibility services such as TalkBack;
- device-specific graphics, memory, CPU, GPU, and battery behavior.
Most Flutter widgets are not individual Android View objects. Flutter renders its own UI surface and exposes an accessibility semantics tree to the platform. Native Android views appear when the app deliberately embeds a Platform View, such as a map, WebView, camera preview, or third-party payment component. This architecture is why a test approach designed only for native Android Views does not automatically provide complete coverage for a Flutter application.
Why does Flutter Android Testing Matter?
A Flutter app can pass checks on one Android configuration and still fail on another because of Android version differences, screen density, OEM behavior, keyboard handling, runtime permissions, chipset and GPU differences, system insets, renderer behavior, or native plugin implementation.
Product quality must also be monitored after release. Android vitals provides production telemetry related to stability, performance, battery use, and permission issues. For all apps, its core vitals are user-perceived crash rate, user-perceived ANR rate, and excessive partial wake locks. Wear OS watch face apps have one additional core vital: excessive battery usage.
Google Play states that core vitals affect app visibility. Apps that exceed bad-behavior thresholds may receive store-listing warnings or reduced visibility on discovery surfaces. Android vitals represent eligible Google Play installations and users who share diagnostic data, so it should complement, not replace, the app’s own production monitoring.
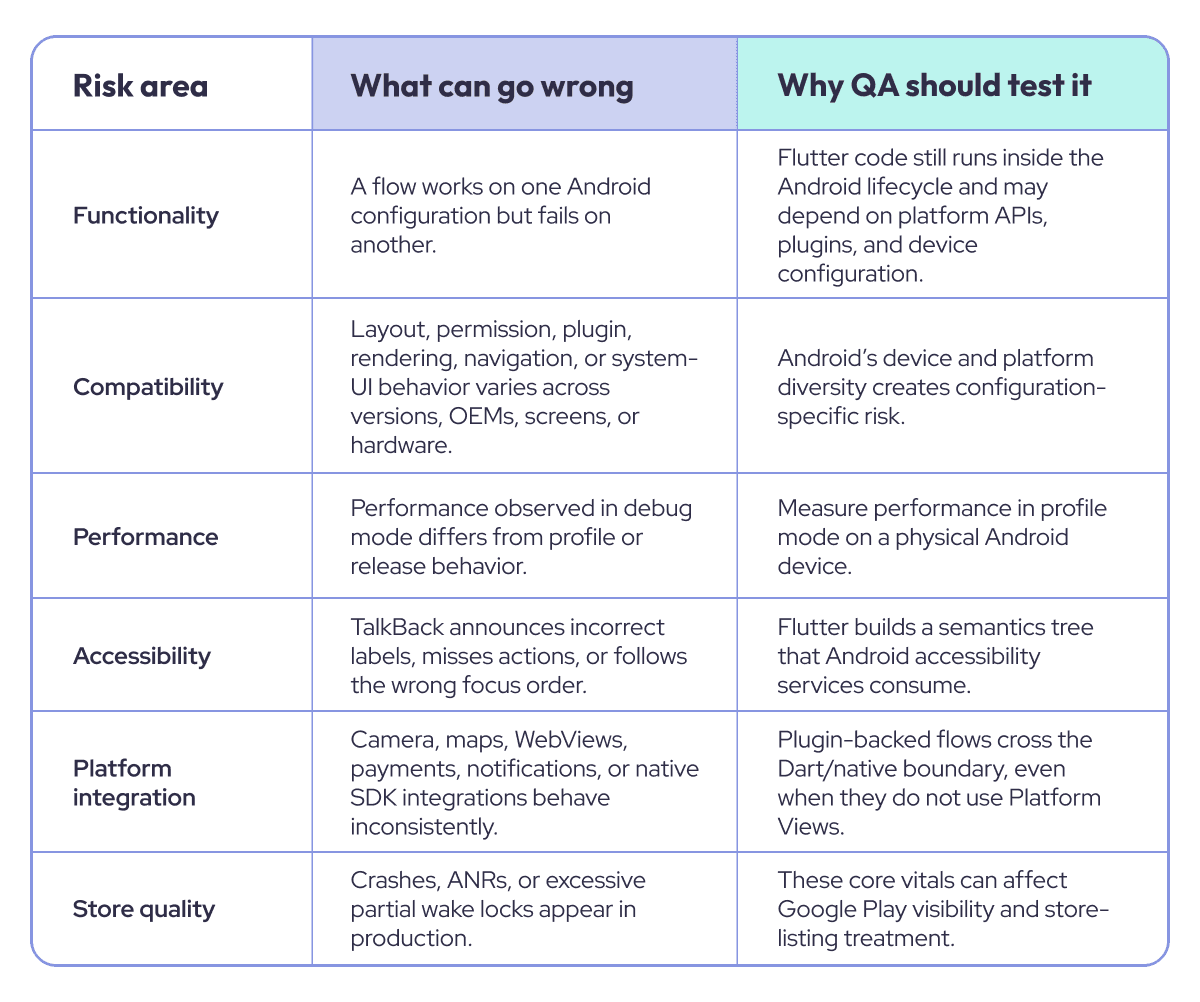
How Flutter Android Testing Differs from Native Android Testing
Testing a Flutter app on Android differs from testing a fully native Android application. Flutter builds, lays out, and renders most of its UI through its own framework instead of mapping each widget to a standard Android View. Android still owns the application lifecycle and many system-level interfaces, including runtime permission dialogs, system notification UI, the Android Sharesheet, system pickers, biometric prompts, system bars, and Settings screens.
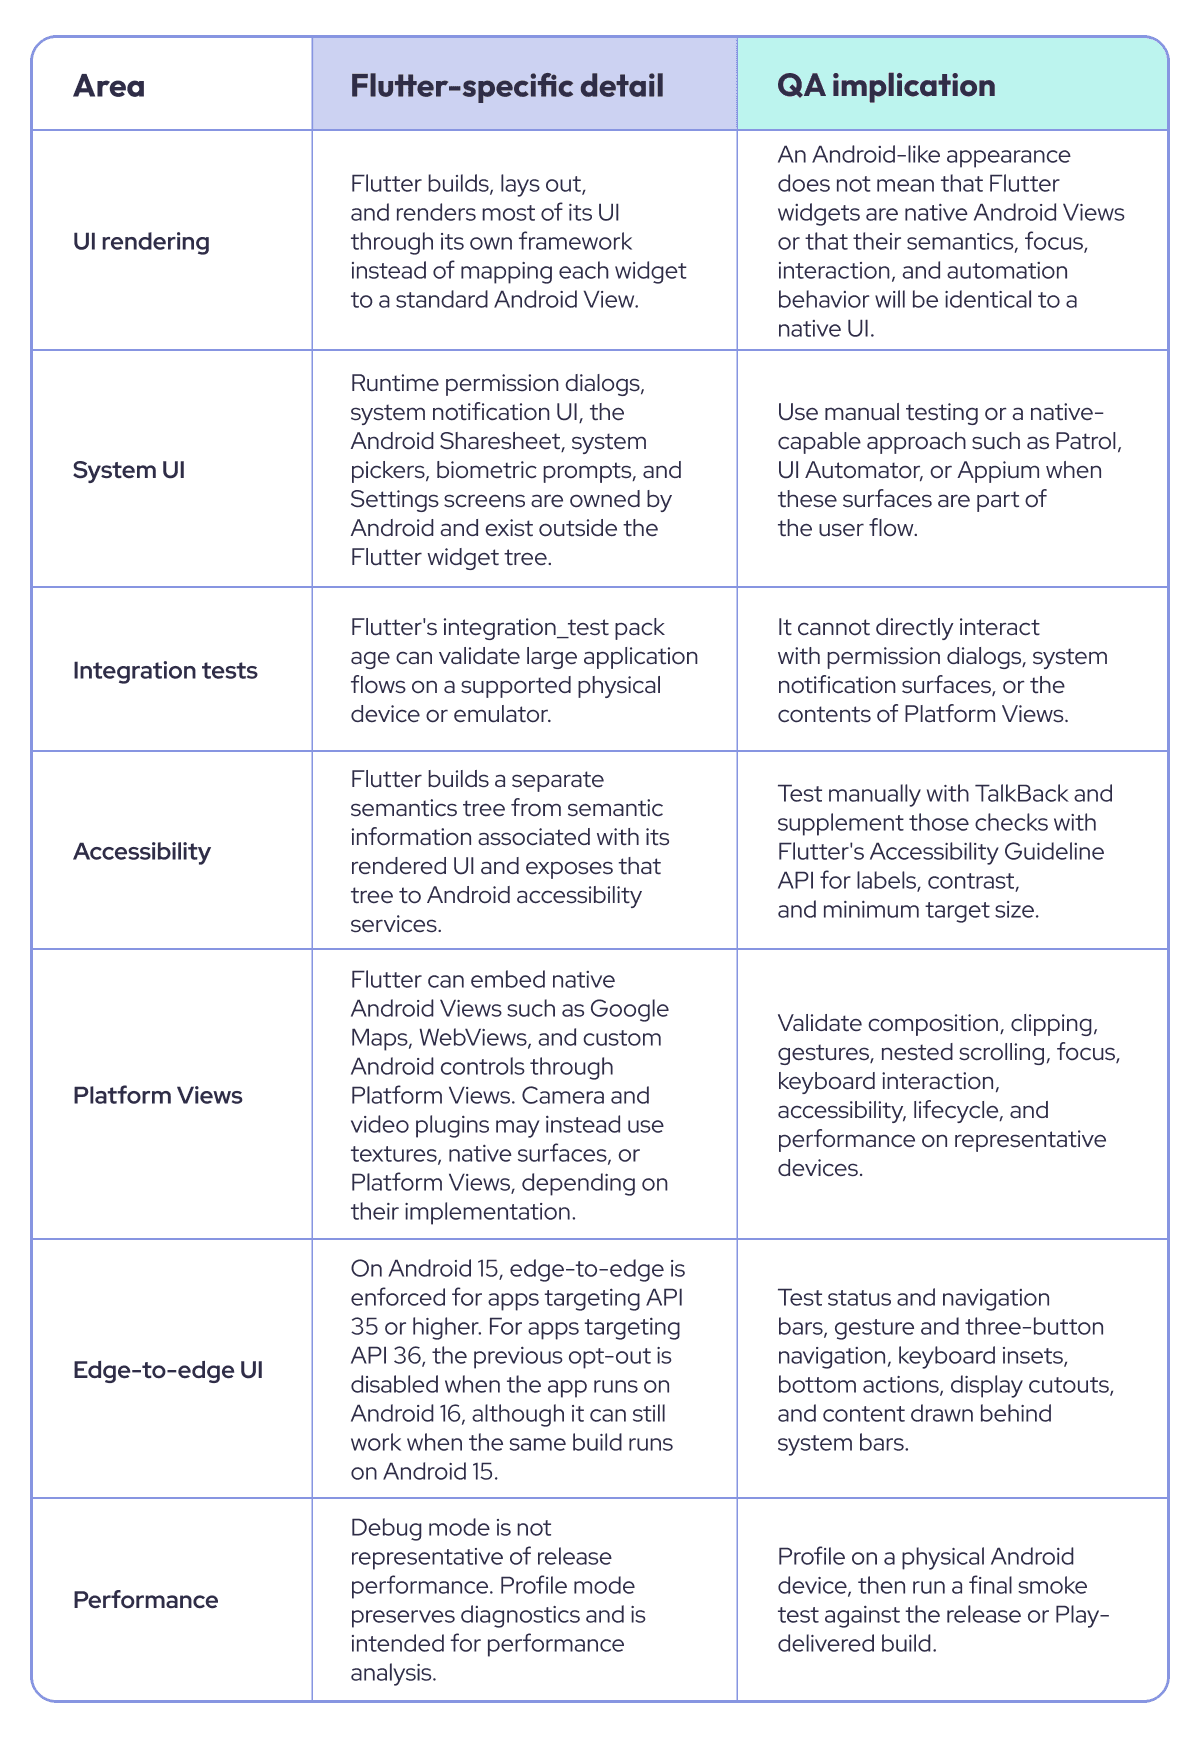
How to Test a Flutter App on Android: 7 Steps
This workflow moves from environment validation to fast automated checks and then to Android-specific validation.
Step 1. Check The Flutter And Android Setup

flutter doctor reports information about the installed Flutter SDK, Android toolchain, Android Studio, licenses, and other development tooling. It can identify Android setup problems, but it should not be treated as the only command that proves device connectivity or full project readiness. Verify Android targets separately: flutter devices and flutter emulators.
Treat unresolved errors under the Android toolchain or Android Studio sections as blockers for Android testing. Diagnostics for platforms the project does not target may be non-blocking, depending on the repository’s supported-platform policy. Flutter’s Android setup guide explicitly separates toolchain validation with flutter doctor from device validation with flutter devices.
Step 2. Check Connected Android Devices
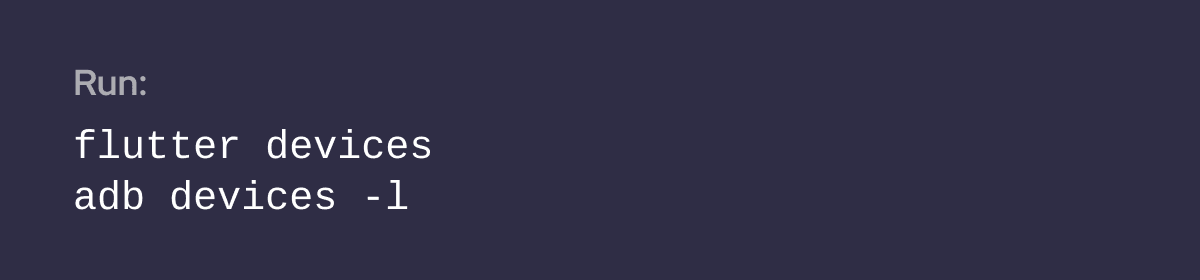
For a physical device, adb devices -l should normally show the device state as device, rather than offline or unauthorized. The device state confirms that the target is connected to the ADB server. It does not guarantee that Android has completed booting or that the application can already be installed and launched. A device can connect to ADB while the operating system is still starting.
If the device is unauthorized, unlock it and accept the RSA debugging authorization prompt. Android does not permit USB debugging commands until the user unlocks the device and approves the computer.
When more than one target is attached, select the target explicitly:
flutter test integration_test/app_test.dart -d <device-id>
adb -s <device-serial> logcat -d
Without an explicit target, ADB reports an error when multiple devices or emulators are available.
Step 3. Run Static Analysis

Run the analyzer against the repository’s committed analysis_options.yaml and dependency configuration.
The underlying Dart analyzer normally reports command failure when it finds errors or warnings, but not when it finds info-level diagnostics. Teams can change this behavior with analyzer configuration and command-line options such as no-fatal-warnings and fatal-infos. The CI acceptance criterion should therefore document the project’s actual severity policy rather than describing one policy as a universal Flutter requirement.
Static analysis is only one part of a CI quality gate. Checks for generated files, localization completeness, forbidden dependencies, exposed secrets, or package licensing generally require separate project-specific tools and should not be presented as built-in capabilities of flutter analyze.
Step 4. Run Unit And Widget Tests

Use flutter test for the project’s standard unit and widget test suite. Integration tests stored under integration_test/ should be run explicitly because they require a target platform and execute in the context of an assembled application.
Unit tests are appropriate for isolated logic such as validators, formatters, calculations, state reducers, retry rules, repositories, and service behavior behind test doubles.
Widget tests validate Flutter widgets in a lightweight test environment. They are useful for UI states, input validation, loading and error states, text rendering, focus movement, navigation intent, and widget-level interactions. They do not prove that Android system UI, a real keyboard, native SDK code, or a Platform View works correctly on a device.
A practical Flutter testing strategy usually uses many fast unit and widget tests and a smaller set of integration tests for important cross-component flows. Flutter presents this as a trade-off between confidence, execution speed, environmental dependencies, and maintenance cost, not as a fixed ratio that every project must follow.
Step 5. Run Integration Tests On Android
Run a specific integration test on a known target:
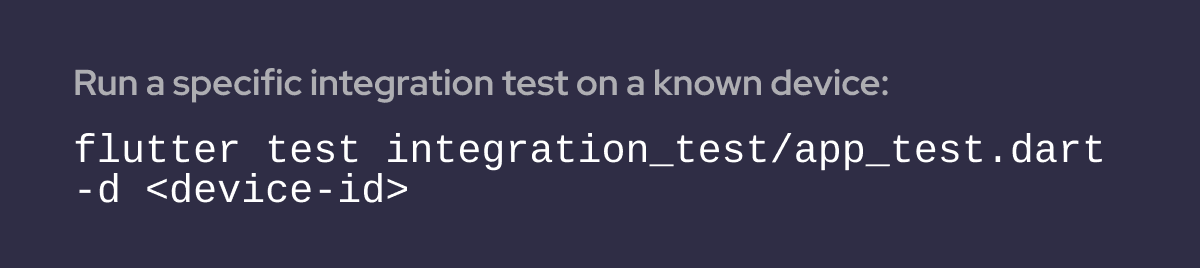
Flutter’s official integration-test guide shows Android integration tests being launched from the project root with: flutter test integration_test/app_test.dart
When the test completes successfully, the output can end with All tests passed. Integration tests are suitable for larger application flows such as login, onboarding, search, checkout, booking, account recovery, profile updates, navigation, controlled offline behavior, and critical plugin-backed operations.
Do not rely on integration_test alone for Android system UI. Flutter explicitly states that it cannot directly interact with native platform UI such as permission dialogs, notification surfaces, or the contents of Platform Views.
Step 6. Validate Android-Specific Behavior

Test Android-owned behavior that Flutter-only tests may not fully cover. This includes runtime and special permissions, notification permission, the Android Sharesheet, keyboards and autofill, TalkBack, system back navigation, predictive back, system bars, keyboard insets, and display cutouts. Also verify plugin-backed flows such as camera, media, maps, WebViews, authentication, payments, notifications, and deep links. Maps and WebViews may use Platform Views, while camera and video plugins may use textures, native surfaces, or other platform-specific implementations.
On Android 15, edge-to-edge is enforced for apps targeting API 35 or higher. For apps targeting API 36, the previous opt-out is disabled when the app runs on Android 16. Predictive back also changes for apps targeting API 36 or higher on Android 16, so test the actual combination of Android version and targetSdkVersion. Use manual testing or native-capable tools such as Patrol, UI Automator, or Appium for permission dialogs, Settings screens, notification surfaces, and other system-owned UI.
Step 7. Check Performance on a Physical Android Device
Do not evaluate performance in debug mode.
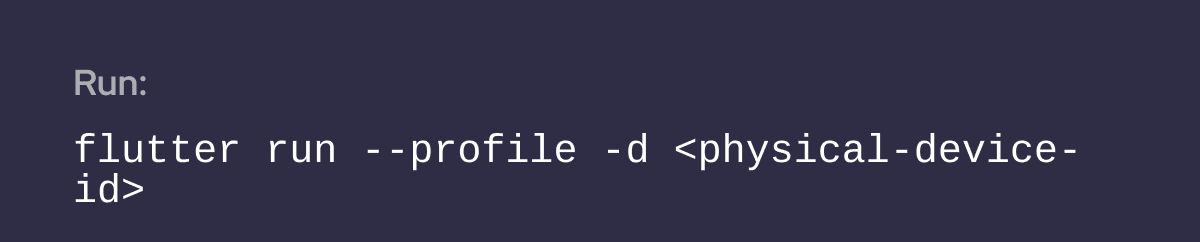
Profile mode is intended for performance analysis and, on mobile, is disabled on emulators and simulators. Test on a physical device, preferably one near the lower end of the supported device range.
Use Flutter DevTools to inspect startup, slow frames, scrolling, animations, CPU activity, and memory growth. Also profile demanding plugin-backed flows such as maps, WebViews, camera, and media playback. Frame budgets depend on the device’s actual refresh rate, so do not use 16 ms as a universal threshold. After profiling, run a final smoke test on the release or Play-delivered build.
Emulator vs. Physical Device Testing
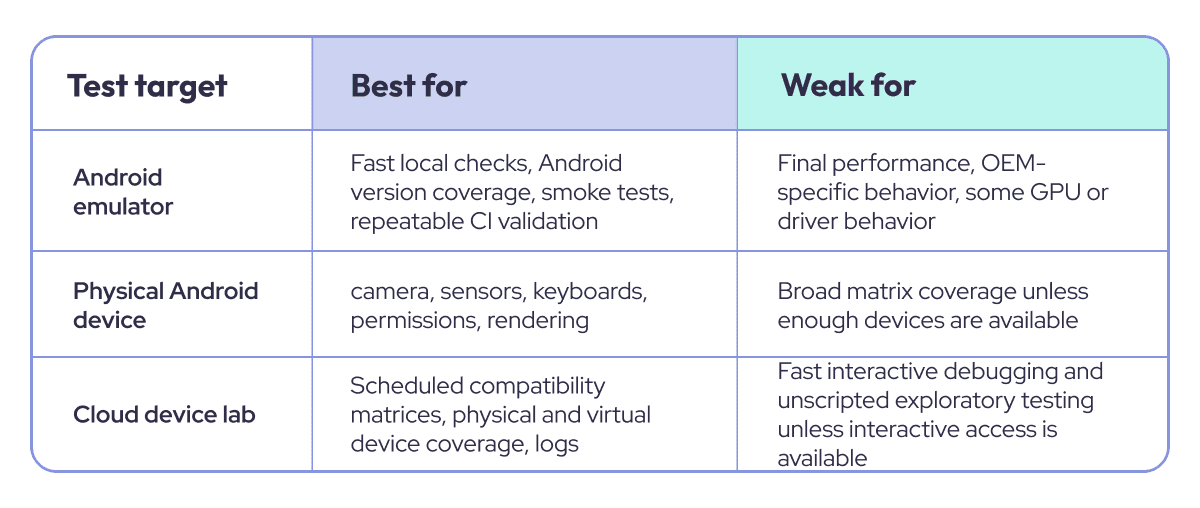
Use both. Emulators are good for fast, repeatable local checks and for covering multiple Android versions or configurations without needing a drawer full of phones. Real devices matter when you care about representative performance, rendering behavior, and final validation of Android-specific user experience. Flutter’s official guidance is especially clear on performance: do not treat emulator behavior as representative for profiling.
A practical rule is simple: run fast checks on emulators, but always finish with at least one real Android phone before sign-off, especially for scrolling, animations, keyboard behavior, permissions, back gestures, and any plugin-backed flow.
Running Flutter Android Tests in CI
A Flutter CI pipeline should keep fast checks frequent and move slower device-level validation to higher-risk changes and release stages. Flutter itself distinguishes fast unit and widget tests from slower integration tests that run on devices or emulators.
On pull requests, run dependency resolution, formatting checks, flutter analyze, unit tests, and widget tests. For higher-risk changes, run selected integration tests for critical user flows on an Android emulator or device. For scheduled or release builds, expand coverage to compatibility, plugins, accessibility, edge-to-edge behavior, and critical regression scenarios. Native Android interactions such as permission dialogs require tooling beyond Flutter’s standard integration_test package.
Performance-sensitive flows should also be validated on representative devices; Flutter supports performance measurement through integration tests. After release, monitor crashes, ANRs, performance signals, and other Android vitals, ideally alongside staged-rollout and product telemetry. For reproducible CI, pin the Flutter SDK version in your CI or version-manager configuration. pubspec.yaml SDK constraints define Dart and Flutter compatibility; they do not replace exact SDK version pinning.
After deployment, monitor Android vitals, crash reports, staged-rollout metrics, support data, and product telemetry. For reproducible CI, install an exact Flutter SDK version from committed CI or version-manager configuration. The environment.sdk constraint in pubspec.yaml defines Dart SDK compatibility. An optional environment.flutter constraint defines Flutter compatibility, but neither necessarily pins one exact Flutter SDK build.
Common Flutter Android Issues QA May Encounter
Flutter Android testing can reveal issues that unit and widget tests do not cover:
- TalkBack testing can reveal missing or incorrect semantics, labels, actions, or focus order.
- Flutter integration_test cannot interact with native Android UI such as system permission dialogs.
- Platform Views such as native maps and WebViews have accessibility and performance trade-offs.
- Edge-to-edge layouts can place controls under system bars if insets are handled incorrectly.
- Layouts designed only for portrait phones can break on tablets, foldables, and resizable windows.
- Rich-content insertion from Android keyboards requires explicit Flutter configuration.
Practical Tips
- Use stable ValueKey or semantics identifiers for important UI elements.
- Keep most tests at the unit and widget level, with integration tests covering important end-to-end flows.
- Measure performance in profile mode on a physical device, not in debug mode.
- When device tests fail, preserve logcat, screenshots, and other useful test artifacts.
Useful Resources for Flutter Android Testing
Our QA team prepared a short list of trusted resources that can help teams test Flutter apps on Android more effectively:
- Flutter Testing Overview — unit, widget, and integration testing in Flutter.
- Flutter Integration Testing — guidance for running end-to-end tests on devices and emulators.
- Flutter Accessibility Testing — practical guidance for accessibility testing.
- Flutter Performance Testing — performance measurement with integration tests.
- Android 16 Behavior Changes — changes relevant to apps targeting API level 36.
- 16 KB Page Size Support — compatibility guidance for native libraries and dependencies.
- Firebase Test Lab for Flutter — running Flutter integration tests across cloud-hosted Android devices.
Keep these resources handy when planning or improving Flutter Android testing. For more practical guidance, you can also explore our articles on Mobile App Testing Strategy for a broader approach to building an effective mobile QA process.
Conclusion
Testing a Flutter app on Android is not a choice between Flutter tests and Android tests. It is an evidence chain that starts with fast Dart and widget checks, continues through Flutter integration flows, crosses into Android-owned UI and native plugins, and ends with a signed, Play-delivered release under realistic device conditions. The QA teams do three things consistently: they test the correct layer with the correct tool, they make the environment reproducible, and they validate the release artifact rather than assuming a successful debug run predicts production behavior.
Luxe Quality provides mobile application testing services that help businesses detect critical defects, reduce release risks, and deliver reliable mobile products. For a Flutter Android project, the practical starting point is a risk review of the app’s target SDK, native plugins, critical user flows, supported device matrix, and current release pipeline.
Comments
There are no comments yet. Be the first one to share your opinion!
For 8 years, we have helped more than 200+ companies to create a really high-quality product for the needs of customers.
- Quick Start
- Free Trial
- Top-Notch Technologies
- Hire One - Get A Full Team
Was this article helpful to you?
Looking for reliable Software Testing company?
Let's make a quality product! Tell us about your project, and we will prepare an individual solution.
FAQ
Run unit and widget tests on every commit or pull request. Run a smaller set of fast integration tests on pull requests that affect important flows. Run full integration or regression suites nightly, before release, or on release candidates.
Not directly with integration_test alone. Flutter documentation states that integration_test cannot interact with native platform UI such as permission dialogs, notifications, or Platform Views. Use Patrol, UI Automator, or manual testing for these scenarios. Appium may also be suitable when it is already part of the project’s device-automation stack.
No. Debug mode includes development tooling and is not suitable for performance conclusions. Use profile mode on a physical Android device with Flutter DevTools, then run a final smoke test on the release build.
There is no universal device list. Select devices based on the minimum supported Android version, target SDK, production analytics, supported form factors, critical plugins, hardware dependencies, Platform Views or native rendering surfaces, OEM-specific behavior, and business risk.
Yes, especially for broader Android coverage and scheduled regression. Flutter integration tests can run in Test Lab as Android instrumentation tests. However, Robo tests do not natively support Flutter, and per-test timing information for individual Flutter integration test cases is not available.